
Vous cherchez un moyen performant d'héberger votre site web avec un CMS ? Vous tomberez rapidement sur Strapi. Si la documentation est encore correcte pendant le développement, elle pourrait être meilleure pour l'implémentation productive. Dans cet article, je décrirai les étapes à suivre pour que votre instance de Strapi soit opérationnelle dans Azure.
Prerequests
To fully understand the article I recommend to get to know the basics of Docker, Strapi and Azure Web Apps.
Setup environment
The Strapi documentation already provides a description of what resources are required. Basically, you need a database, a storage for assets like images, an App Service plan and an App Service where Strapi will be executed. Unfortunately, Strapi has no support for MS SQL databases. Therefore, you can’t use an Azure SQL Database which would save you some money.
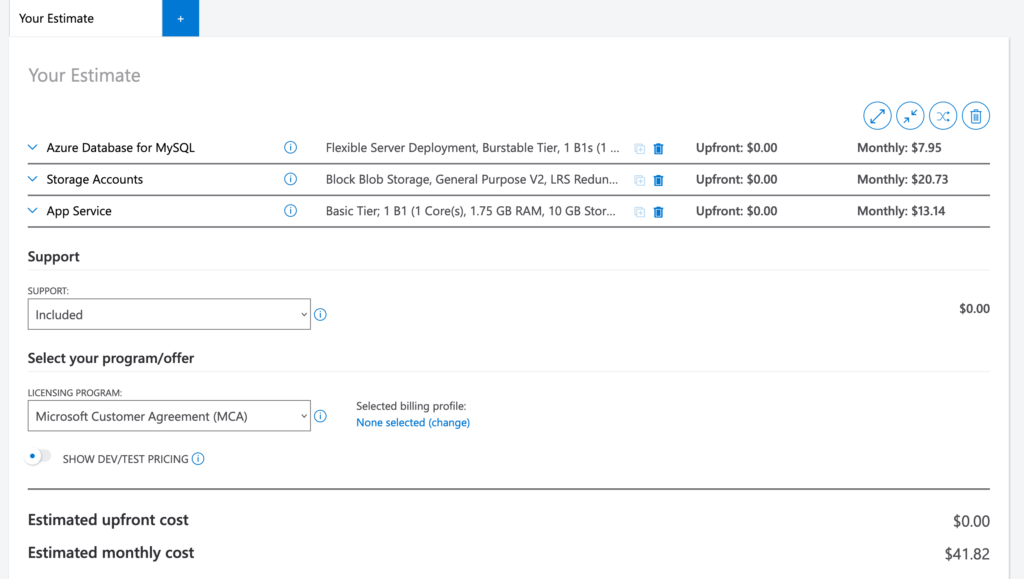
Microsoft offers a tool called “Pricing Calculator” where you can figure out the estimated costs of your desired configuration before deploying resources.
I played a little bit around to find a solution that fits my needs and does not cost that much. The Pricing Calculator only provides an estimation of the costs. If you scale up your environment, it could be more.
There are many ways to set up resources in Azure. If you only set up a single environment I’d suggest to create the resource in the Azure web portal.
Setup database
You have two options you can choose from:
- Azure Database for MySQL
- Azure Database for PostgreSQL
I used the MySQL version. Microsoft recommends to use the “Flexible Server” approach. It offers a fully managed database service and saves a bunch of costs. You can also start small and scale it up later.
After choosing Create a resource > Azure Database for MySQL > Flexible Server you can configure the resource (i. e. choose resource group, server name etc.).
The “Workload type” section could be misleading. The decision you make here influences the “Compute + storage” section. I wouldn’t give it too much attention and start with Standard_B1ms compute tier for small websites. According to the Strapi documentation it should be adequate for many Strapi workloads.
In the “Networking” configuration you should choose “Allow public access from any Azure service within Azure to this server” to allow your Web App to access the database later on.
To see how to setup the Strapi database user, see Microsoft docs.
Setup storage account
Setting up a storage account is pretty straightforward. Strapi only needs a standard storage account. The most important setting you have to check is “Enable blob public access” in the advanced configuration. Without it, it’s not possible to access the assets from an external source like your website.
Azure Service Plan & App Service
The final component is responsible for the execution of Strapi. In the “Compute” category, you find the service “Web App”. When you create a new instance I’d suggest to use “Docker Container” as publish option. The node_modules folder contains thousands of small files that lead to a long deployment duration. In the context of Docker it makes sense to use Linux as operating system. It’s less expensive too.
In the “Basics” section you also see an area to configure an App Service Plan. This is the foundation for all App Services. It defines a set of compute resources for a web app to run on. You can compare it to a server farm in conventional web hosting. Multiple App Services can be executed within one App Service Plan. If you want to host the website itself in Azure too, you can create another Web Service in this Service Plan to save some costs.
Next, you see options to configure your Docker environment. For Strapi, it’s fine to use “Single Container”, because all other required resources (database and storage) are located in separate services. As the image source select the desired registry. If you use something else than provides (i. e. GitHub Container Registry) you can configure it by selecting “Private Registry”.
Prepare Strapi to run in Docker
Now that we have configured all our resources to host Strapi on Azure we need to create a Docker image for Strapi. If you have already set up your Dockerfile you can skip this section.
Unfortunately, Strapi already needs some space. To reduce the image size to a minimum I use the distroless node image from Google as a base. I also recommend to only copy the directories you explicitly need into the image. The distroless images come with reduced functionality. Therefore, I don’t use them to build the application. Here you can see the configuration I created to build the image:
FROM node:gallium-buster-slim as build_base
ENV NODE_ENV production

FROM gcr.io/distroless/nodejs:16 as base
ENV HOST 0.0.0.0
ENV PORT 1337
ENV NODE_ENV production

FROM build_base as build

RUN mkdir -p /usr/src/app
WORKDIR /usr/src/app

COPY . .
RUN yarn
RUN yarn build

FROM base as strapi

WORKDIR /app

COPY --from=build /usr/src/app/build ./build
COPY --from=build /usr/src/app/config ./config
COPY --from=build /usr/src/app/database ./database
COPY --from=build /usr/src/app/public ./public
COPY --from=build /usr/src/app/src ./src
COPY --from=build /usr/src/app/node_modules ./node_modules
COPY --from=build /usr/src/app/package.json ./package.json
COPY --from=build /usr/src/app/favicon.ico ./favicon.ico
COPY --from=build /usr/src/app/server.js ./server.js

EXPOSE 1337

CMD ["server.js"]
Maybe, you already noticed I have a JS file called “server.js”. This is the entry point of the app. You need to create this file on the root directory of your project by your own. It’s not provided by default. It’s needed, because the distroless image can not execute npm or yarn commands.
const strapi = require('@strapi/strapi');
strapi().start();
Strapi is now ready to run in a Docker container. Personally, I prefer working with (almost) the same environment locally as in production. That’s the point where Docker Compose comes in. I only use it for my local development and not to deploy it on Azure. Fortunately, all services Strapi depends on are available as Docker image.
version: '3.9'

services:
  strapicms:
    build: ./
    ports:
      - "1337:1337"
    environment:
      DATABASE_NAME: strapi
      DATABASE_USERNAME: ${DATABASE_USERNAME}
      DATABASE_PASSWORD: ${DATABASE_PASSWORD}
      DATABASE_HOST: mysqldb
      JWT_SECRET: ${JWT_SECRET}
      API_TOKEN_SALT: ${API_TOKEN_SALT}
      APP_KEYS: ${APP_KEYS}
      STORAGE_ACCOUNT: ${STORAGE_ACCOUNT}
      STORAGE_ACCOUNT_KEY: ${STORAGE_ACCOUNT_KEY}
      STORAGE_CONTAINER_NAME: ${STORAGE_CONTAINER_NAME}
      STORAGE_URL: ${STORAGE_URL}
    depends_on:
      - mysqldb
      - azurite-v3

  mysqldb:
    image: mysql:5-debian
    command: mysqld --default-authentication-plugin=mysql_native_password
    ports:
      - "3306:3306"
    volumes:
      - mysql:/var/lib/mysql
    environment:
      MYSQL_DATABASE: strapi
      MYSQL_USER: ${DATABASE_USERNAME}
      MYSQL_PASSWORD: ${DATABASE_PASSWORD}
      MYSQL_ROOT_PASSWORD: justapassword

  azurite-v3:
    image: mcr.microsoft.com/azure-storage/azurite

volumes:
  mysql:
The placeholders (marked with ${}) are variables that will be filled with the content out of an environment file (.env) automatically when starting the compose file with docker compose up -d. The env file has to be placed in the same directory as the docker-compose.yml. After filling the environment file start the Docker Compose and check if everything is running well.
Putting everything together
Now, we have everything ready to deploy Strapi as Docker container on Azure! But if we try out to deploy and run it now it will fail. Before the application can be executed successfully the environment variables have to be configured in the Web App. This was the point which wasn’t mentioned in the Azure deployment guide of Strapi and I had to search a little while what Strapi needed to run correctly.
In the Azure Web App under Settings > Configuration you can configure the application settings. These are the settings that replace the .env file in the cloud environment.
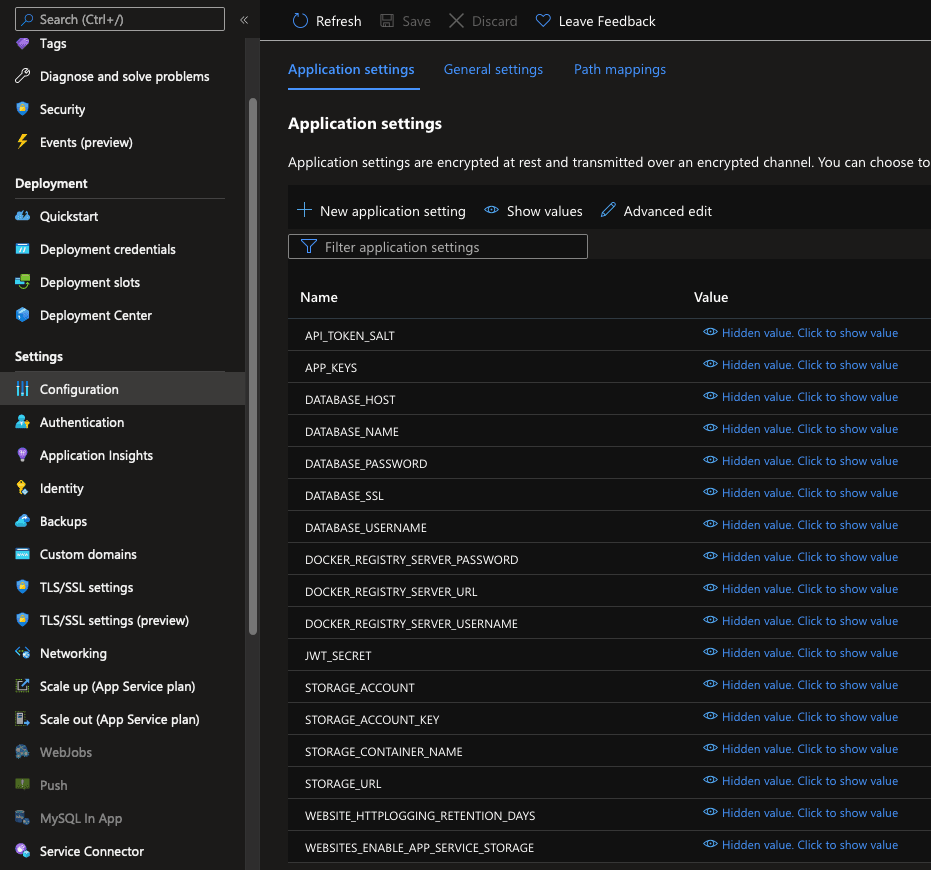
Basically, you need to define all the variables as you did in the local development environment.
API_TOKEN_SALT: random string of numbers and letters
APP_KEYS: ["DATABASE_URL", "NODE_ENV"]
DATABASE_HOST: host name of your  mysql database (in Azure <name>.mysql.database.azure.com)
DATABASE_NAME: e. g. strapi
DATABASE_PASSWORD: password of the database user used by Strapi
DATABASE_SSL: true
DATABASE_USERNAME: username of the database user used by Strapi
JWT_SECRET: random string of numbers and letters
NODE_ENV: production
PORT: 443 (to run Strapi on the default HTTPS port)
STORAGE_ACCOUNT: Name of the storage account that was assigned in Azure
STORAGE_ACCOUNT_KEY: Password to the storage account (created by Azure)
STORAGE_CONTAINER_NAME: Name of the storage container already created
STORAGE_URL: URL to Azure Blob Storage (https://<name>.blob.core.windows.net/)
Logging and fetching errors
There are several ways to fetch the logs of an application. The easiest way is to just enable the file system logging. Then, you can see them in the Diagnose menu. To enable file system logging, open Monitoring > App Service logs in your Web App and set application logging to “File System”. To access the file system logs in the portal, open Diagnose and solve problems > Application Logs in the Web App. There you can see the output of Strapi and identify errors if it won’t start.
Summary
By getting Strapi hosted on Azure I learnt a lot about Docker and troubleshooting an Azure Web App. Docker is a requirement to transfer your latest changes fast and don’t have to deal with issues of different environments (Linux, Mac, Windows; local or remote etc.).
Hopefully, I could help you setting up your Strapi instance on a production environment.